Wow, six months since I last posted something, not sure what happen there. I guess between work, family, home improvement, and critter control (bats in the attic vents) the time just whizzed by, kind of depressing… But no I am not dead yet, and neither is the new build, in fact it should have its maiden flight in the next week if I don’t break something again.
I left off in the last post with having just cut some new parts to replace one that I broke while running some tests… well after sanding, priming and painting those… I was unable to fit everything thing together due not pre-fitting the pipes before I started assembly, it was too tight and I split the pieces trying to pull it apart… there is no photographic evidence, but it wasn’t pretty when I was done with the rubber mallet. Re-cut the parts, drill, sand, prime paint… and I split both of pieces clamping down the z axis pipes… not happy. At this point I went back to the previous version of the parts, I did not sand anything, but did prime and paint, and I had no issues with the assembly, of course the parts are rough looking, but it is together.
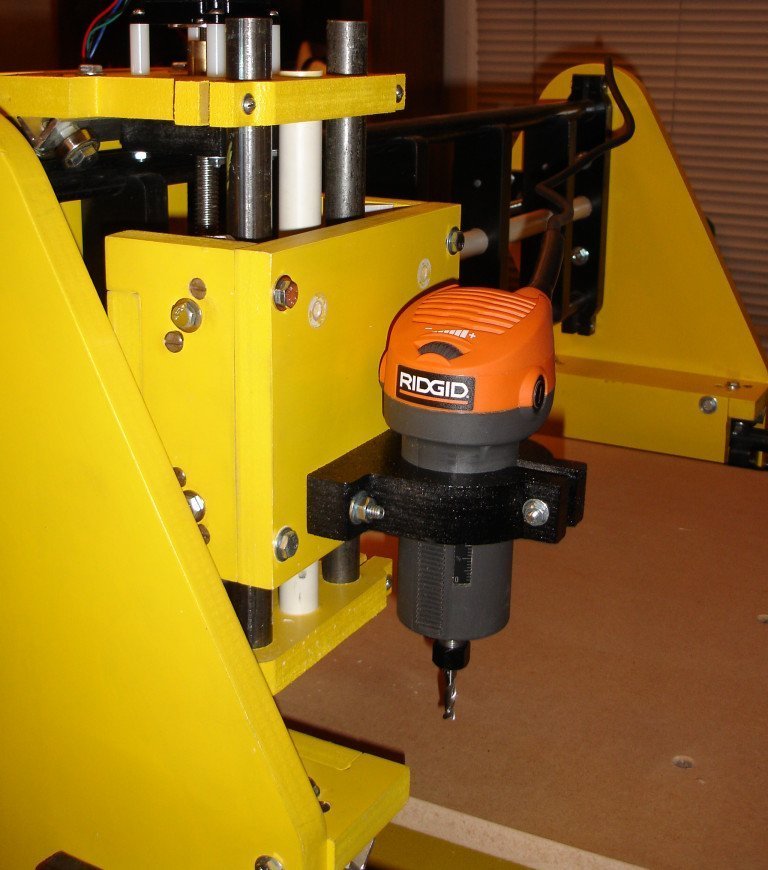
So the next step was to mount the router. I purchased a Rigid R2400 back in January, but looking at the router and the machine, I realized I had been thinking about the Dewalt DW660 when I design the mounting plate. The DW660 is a much longer tool than the R2400, so I could not use all 4 holes that I had planned for mounting the router. I ended up cutting a simple clamping mount out of some Trex decking I had left over from re-cutting the lead nut carriers, I think it came out well and it seems plenty solid.
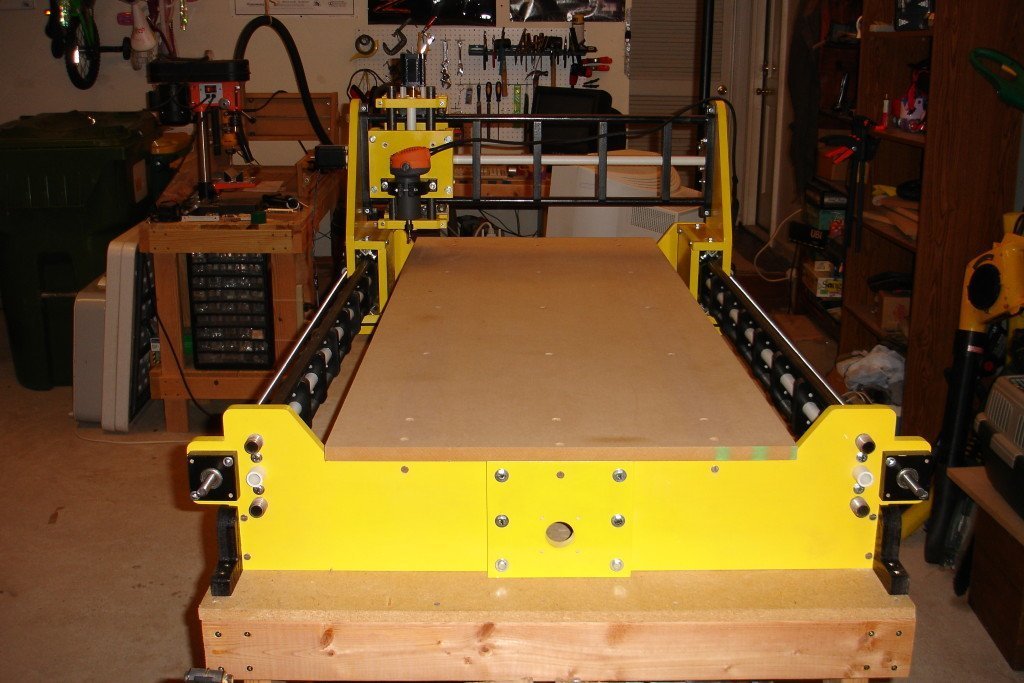
So now I needed to square and tighten everything up, but I was concerned that the machine base was not rigid enough. I had originally planned on having side rails attached to the Y axis legs that would ensure even spacing of the legs and help sure up things, but once I started assembling everything I found that there was not enough clearance between the gantry and the proposed side rails. Since I already had holes for the side rails, I decided to cut some small legs (more like brackets I guess) to fit into the rail mounting holes and use these to anchor the machine to the table. Yes they look a bit goofy, but it is for the greater good.
Once these legs were attached I proceeded to square the machine to the table top and screw it down. The goods news is that it is not going anywhere…ever, the bad news it that If I need to pull it apart to fix something it is going to be ‘not fun’. Everything else looked pretty good except for the gantry legs, which had some splaying toward the top… out came the rubber mallet… I managed to square things up and not break anything for a change.
So this is where things stand as of right now.
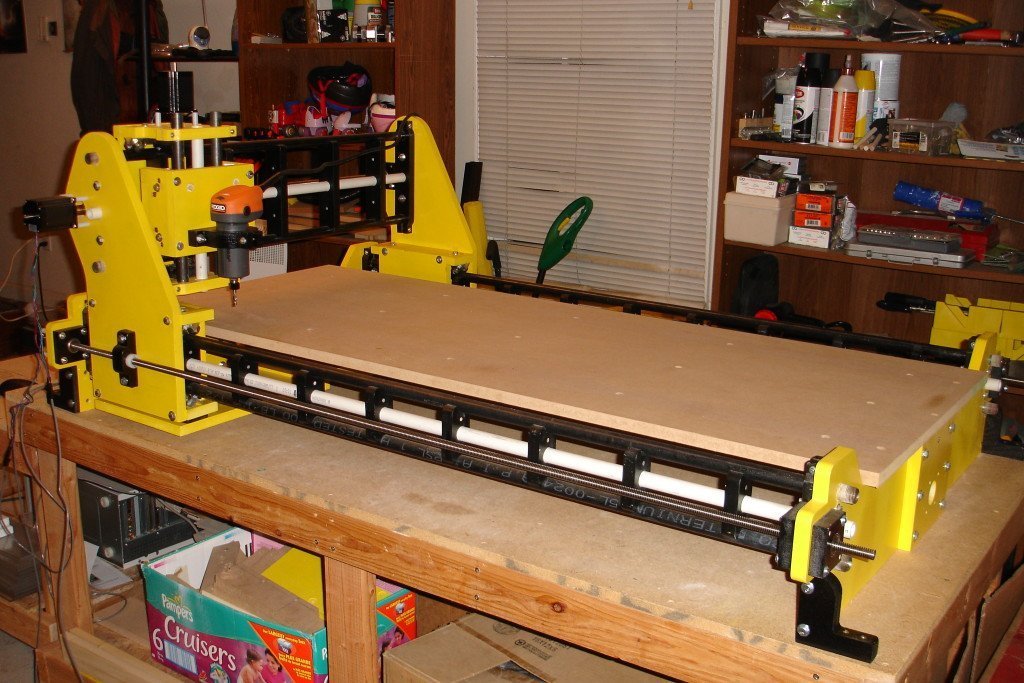
I still need to do some tuning in EMC2 to see if I can get better than 30 IPM out of it, get the cables out of harms way, and hopefully get some sort of vacuum mount set up so I can use the Dust Weasel with it. But I am telling you man, it’s almost there.
Hello,
I would love to build this CNC. Please do this in kit form… I am sure to be your first customer. Keep up the good work and look forward to seeing the progress.
Keep it up!
What size are you looking for? I am in the process of refining a few parts and then I am going to build the next iteration, should be a much quicker process this time. I was thinking about scaling it down a little bit since I do not have room for another 3′ x 6′ table, I was think about 12″ x 24″ cutting area, the machine would be ~24″ x 36″ overall. Still planning on offering the 2′ x 4′ cutting area as well, just want to fix a few things before I call it done. Any thoughts?
Hello,
I am actually more interested in the 2′ x 4′. You should set up a poll on this website or over at the cnczone to see what your potential customers would like. Reason I am asking about your cnc in kit form is, it will be my first CNC. I do not have a cnc to machine out parts for a bigger build. I am curious, what is the overall size for your 2′ x 4′? I would be using it for milling out parts for a home sim… as well anything that would pop up having a new toy…
Keep it coming!
I am just about done refining the design a bit, planning on cutting out a 1’x2′ version of the machine in the next day or two and see if everything fits together correctly. If it does, I may be ready to start offering kits. This is uncharted territory for me, I have never run any sort of business before, so I need to get my head around what I need to do to make it successful… I should have more information in the next week or so. The 2×4 takes about about 3×5 due to the bulky nature of the rail parts I am using (the 1×2 takes up 2×3… etc and so on.) I will think about the poll, but given the nature of this design, it will be real easy to offer it in several sizes, I only have to modify a few parts to change the width, and changing the length just means add or subtracting copies of other parts. I will let you know when I am ready to ship my first one.
Thanks,
Don Bailey – aka GrumpyGeek
Hey Don,
I understand how you feel about the ‘uncharted territory’. I am sure everyone who will even look into buying one will have some understanding that this is a DIY project. If they are looking for a commerical product… then they should go out and buy one. My 2 cents, before a person paypals you funds, make sure they clearly understand what they are getting into and that there may be some risks that they have to assume. Unless I am wrong, I understand that this is not your day job… just something you do on the side out of your own interest and you are sharing to the community. Having said that, I do know there are jerks out there that will expect the sky and the moon… protect yourself before cash exchanges….
Questions….
Will these be full kits or partial? AFAIK some kits sell the machined parts and provide the builder with a parts list needed for assembly correct?
How much documentation are you planning? I will be a beginner…
More ? to come in the future…..
Thanks Again,
Robert
Partial kits, how partial depends on what people want. I know when I was building my first machine, I only owned a few basic hand tools and found it frustrating to have to redo parts when something was too far out of wack. I was thinking I would provided all the cut parts, the bearing assemblies, and possibly the DIY lead nuts and some very cheap 1/4″ to 1/2″ couplings I have been playing with. It just depends on how much I can automate the construction of the of the non-wood parts. That would leaves the table top, lead screws, misc. nuts and bolts, router, an all the needed motors and electronics to buy (and software/etc). I could make it more partial by including some of the drilling templates that I have made for drill the side hold for all the cross dowels and aluminum angle, but introduces risk, MDF can split fairly easily if you are not careful, if I split a piece, I can just make another one.
As for instructions, I would probably start some very basic diagrams and provided a video of the assembly process. If I get enough interest I might take some of the proceeds and contract a friend of mine to create a nice manual.
This defiantly a part time thing, I work 50+ hours a week, and have a wife and twin 6 year olds I need to there for. I love playing in the garage, but it gets dropped when there are schedule conflicts. Will defiantly be sure to set expectations, I am trying my best to develop a kit that is pretty easy to assemble and resilient , but also cheap, so there are limits.
I am playing with the the idea of using 2″ pvc pipes to connect the end boards with (the Fireball V90 does something like this) and moving the screws (the dual and the single screws options) under the table as well, do you have any issues with this? I am hoping to cut all the parts out tomorrow (Sunday) and see how things go. I’ll try to keep you updated.
Thanks,
Don B.
Hello,
So you know, I actually like the look of what you have designed now. I think the paint job really makes it stand out, but the way its structured is very hmmmmmmm…industriously elegant 🙂 Maybe a reason others like it too.. lts build up looks simple despite the precise work it does….so if you can keep it the same thats fine.. But if you are seeing benifits with a redesign or slight modifications…go for it. I am curious what causes you to add the pvc pipe and moving the screws inboard? When you did get to the kit stage, I would like to get one that would have all the parts cut out for me. I have never worked with MDF, but from what I read and as you said, it splits easliy. I read somewhere that one cnc build used veneered MDF.. I think it was the Lionclaw build.
I can tell you the factors I am looking at…. easy to moderate build… good price point… and as you said solid design. If you have all the machined part and a list of hardware required.. that should be good enough. Of course the fabricated hardware would be nice too! Not to be lazy… but this will be my first construct… so… I hope most if not all of the ‘hard, tricky, crutial and finicky parts’ be taken care of… I guess this is what I would be paying for 🙂 So when I got some free time .. I could slap it together…
I really need to brush up on this hobby along with its nomenclature…. the electronics side of the house will be easy…. the mechanical side.. will require some time.. 🙂 There are some terms and concepts I need to get a firm grip on.. so my questioning can become more direct…. off to reading….
Happy CNC’n
R
How about GCode and a parts list?
The original plan was to release the dxf files for personal use, I will consider gcode files (cut2d files) as well. I am a little concerned though, as I am thinking about trying to turn this into a part time business and would hate for someone else to be churning out machines as well… guess I’ll have to take my chances.
Sorry for the slow progress, only managing to steal a few hours a week at the moment, so it is taking forever to get the new machine cut out… defiantly need to get better (fast) lead screws if I am going to try and churn out kits. As soon as I am done, I will let you know.
I am thinking about building the machine from the book, Build Your Own CNC Machine. I may just go ahead and do that anyway but I think ultimately your latest design is the way to go and I definitely want to build yours. It seems so simple and elegant. If I build the Book CNC I already see changes I want to make. I am going to use Birch MDO instead of MDF. I am thinking of inserting rods between the two 3/4″ layers that make up the deck and I want to redesign the section that holds the router. Hate the shelf idea because it wastes 3/4″ of cutting depth.
I went to Lowes and Home Depot today looking at routers. For my first CNC Router I am thinking of using a DeWalt D26670 Laminate Router which is only $79.95. They had the Bosch Colt there as well but I think you mentioned somewhere it had issues.
I am pretty sure I stumbled across the buildyourcnc site from a link on hackaday and that pretty much started my whole CNC journey, the roller bearing on aluminum angle is very smooth, the newer machines that use the v-bearings are nice too, but the cheapest I can find the v-bearings to about $7 a pop (around $100 for a set of 16) which is still a bargain and makes for a easier to build machine… I will probably head down that path eventually (before or after belt drive I am not sure).
As far as routers are concerned, I had read that some people where having issue with the plastic around the bearings melting…. but this was after several hours of continuous use. I may actually go with a $25 Harbor Freight model next time, a lot of people use them couple to a speed control box and are perfectly happy with them, all depends on what you are planning on using the router for. The goal of my first machine was to make something to cut 2d parts with as cheaply as possible… mission accomplished, but then you always want more 🙂
Grumpy,
FYI—if i saw your machine first would have bought your plans. I am at the beginning of my cnc journey. Again, if you build it they will buy. The reason for me to go down the cnc road is that im tired of cutting 3/4 white mellamine with templates. I bought David Steel’s drawings (solsylva) and printed the jgro set. at this time i am limited on space so i will build something in between. What concernes should i have when i need to cut 3/4 white mellamine with somewhat of a fast feed rate?
Check out this cheapie
router at Amazon. Looks exactly like the one at Harbor Freight. Both
get lousy reviews because of the useless base but they would be perfect
for a CNC Router.
I think Grizzly also offers this router in a plastic and metal version, it seems like a good router for starter CNC set up, and it’s hard to bet the sub $30 dollar price of the HF and buffalo versions. My R2400 came with some great accessories that will likely never leave the box…
Thanks, wish I had plans to sell 🙂 I swear I’m going to finish all of this stuff soon. I am excited about getting it done, and very frustrated that the rest of my life doesn’t leave me enough time to knock it out a few 3 hour sessions.
What is the space your are trying to fit into? At the moment, my designs pretty much require +1 fr in addition to the cutting area, and it is not likely to change unless I switch to V bearings.
Do not have any experience with melamine, just a lot of MDF, using a hobby machine you will have to make multiple passes to get thru 3/4″ the max I currently cut MDF is 1/4″ passes as fast as my machine will go (~36ipm), if you use a faster drive system you could probably do it much faster. Ask around @ cnczone, I am sure someone can help you there.
Have you found the extra motor vs one motor offers an advantage? What do you think about the single motor method mounted behind gantry and driving timing belts on each side? The buildyourcnc router is making my head explode reading through their forum. The book has bunches of errors and they almost have a lazy attitude about the book version of their first cnc router. I find myself having to glean the forum for all the corrections and I am not even sure I am finding all of them. It is a fun journey for sure because I am learning quite alot.
How about selling the wood parts and provide a parts list and make some videos assembling the machine? I like the BlueChick at buildyourcnc but it’s too small and it seems I can build their book version for under $600. Someone on Ebay sells a parts kit for $195 which is probably close to double what the individual parts actually cost. The electronics and motors on Ebay is around $250 shipped. The rest is cost of wood and the purchase of tools not at hand.
Here is the speed
control box from Harbor Freight.
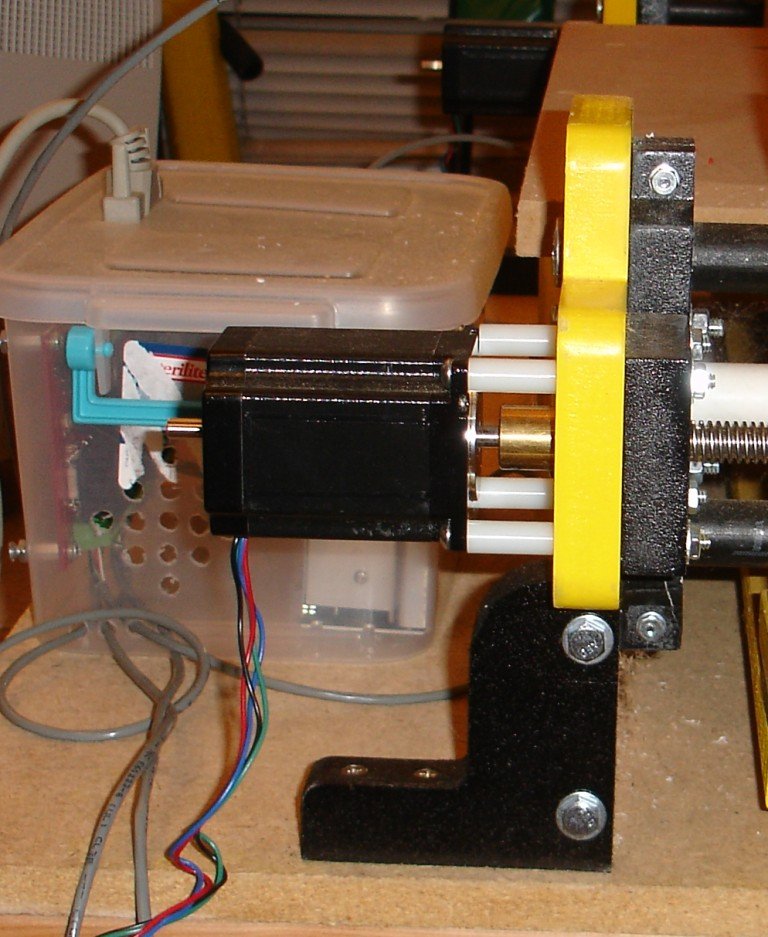
On my first machine, my motors were only 116oz, so I opted to build a machine with dual screws in the belief I would need at least 180oz of motor to move the gantry. When I started the second machine, I did not have a clear vision about what the final form would be so I made both options available. I decided to go with dual screws on the outside of the gantry to allow for easy adjustments and used 2 motors to seems like the easiest option (as opposed to belts and pulleys)/
Finding cnc information on the net is fun and frustrating…. but it is already a lot better then 2 years ago. I have not looked at the book, the machine on the cover doesn’t quite look like the machine he first built, and nothing like the new ones… he seems to have ample time to tinker (I’m jealous of that 🙂 ).
I was thinking of a kit that would contain all wood parts except for the table (all cross dowel bolt holes drilled), assembled bearing assembles and optionally the lead nuts (my cheap ones). That would leave cross dowels, bolts, t-nuts, lead screws, couplings, wood for the table, pipes, motors, electronics and software for the user to provided. The machine lends to self to variations, so I was thinking of providing options for 12″, 18″, and 24″ cutting widths and up to 60″ cutting lengths (longer if you can find better than 6ft lead screws). Pricing still needs to be worked out, I know what I would like to offer it at, but that might not economically feasible.
What do you plan on cutting? The general rule I see for hobby routers is to buy/build the smallest machine that you need, as the tolerances and flex are generally better on the smaller (wood based) machines. I think all the newer buildyourcnc machines look great, but I know they are out of my price range as a hobby.
I figure a cutting area of 24 x 48 would be pretty good. If I decided I
wanted a bigger machine then I could make it with the smaller machine.
The motors I am looking at are 270oz.
Watching the videos on the buildyourcnc site are sometimes quite
entertaining.
Do you think galvanized conduit is too lightweight for a rail system?
Looking at the book design it seems the linear bearing on the side of
each machine puts the weight of the gantry on the top of the aluminum
angle making the bottom half of the bearing with little or no load. For
some of the parts I am thinking of using either deck or drywall screws
and wood glue. Right now I am playing with the design using CorelDraw.
I was at home depot today looking for 1″ or wider Aluminum Angle and
all I could find was 3/4″ in 8 foot lengths.
For your DIY couplings you can get a fairly inexpensive cutoff saw at Harbor Freight that is good upto 1″ diameter stock.
What funny is I really wanted the 24″ x 48″ to let me cut out larger parts, but in reality, I think a 12″ or 16″ x 36″ would actually fit most of my needs. The problem I am having with the big machine is that it takes so long to cut all the parts @ 30 ipm, I had a 3hr run the other day, which is great, but hard to fit into my free time periods. I think multi-start screws or a belt drive system is in order in the next 6 to 9 months.
I do think conduit is too light weight for unsupported rails of any length, but it might work ok if the conduit was attached to something else.
If you are planning on using MDF, I would avoid screwing into the edges, it split way too easily… at least pre-drill everything. That being said I have drilled and tapped into the edges of MDF with pretty good success. The Rockcliff Model D I built is all glued to together and uses 3/8″ rods embedded in MDF for the bearing slides, it all work very well but having never worked with glue and clamps before is was an exercise in patience.
I looked into the HF cut off saws, however I was informed that you should not cut aluminum with abrasive discs as the aluminum melts and fuses to the pad, and/or they start to disintegrate. I am looking at buying a cheap miter saw and using a blade designed for aluminum once the need arises.
Don,
Check out these two websites: http://www.metalsforasteel.com and http://www.modernlinear.com.
Bill
Look for this at your local Home Depot.
PureBond® 3/4 in. x 4 ft. x 8 ft. Spliced Birch Plywood
Model # 269948
Store SKU # 269948
or this
3/4 in. x 4 ft. x 8 ft. Red Oak Plywood
Model # 165956
Store SKU # 165956
Same as above but with w Red Oak veneer.
I have seen the veneer plywood at HD, just never thought about making a machine out of it. It is only $10 more than the MDF, so maybe I should take a look… after I use up the sheet of MDF I just got yesterday…
I’m considering building the buildyourcnc.com router (from the book/plans provided – and yes, there are *many* annoying errors and inconsistencies in all of the information provided – I suggest modeling the machine yourself before cutting any material). After reading about how nasty MDF is to machine (I’m planning on milling some of the smaller parts on my taig cnc mill), I’m considering using a BB plywood for the base material. However, like the last couple of comments made here, I’ve also ran across the PureBond products at my local Home Depot. I’m weary about building my machine from this material, and am curious if anyone has any real world experience with this product – specifically in the use of building a DIY cnc router.
Any information or insight would be greatly appreciated!
I haven’t tried the pure bond stuff , but I did a little research and it looks like it is a good product, I might try some when I replace the 2×4 machine as I am just about over dealing with MDF. MDF splits too easily, every time I have dropped a part made of MDF it has split on the edge (always seems to land on the edge..), very unforgiving stuff.